Sunday, June 20, 2010

Day 14 - Two Weeks In

The bathroom project started two weeks ago. It's amazing to see what it looks like now compared to then. Even over the last two days it's been a huge change.

The biggest thing that's been going on is that the venetian plaster is almost finished. This stuff is a lot easier than I thought it would be. The instructions on the can and everywhere online pretty much sum it up. Using the 3-pack of trowels sold at Lowes (or wherever else), apply a thin first layer, wait for it to dry, then do a thinner second and third layer. When that's dry take the trowel and burnish it which brings out the shine. It comes out smooth - almost like glass when you're done. Apply a protective coating only if you want to, which we did because it's a bathroom.


The main part of the bathroom is more or less done - at least all that can be done while the cabinets are still in there anyway. The water closet is coming along pretty well. The first layer is done, and I'll do the second and third tomorrow afternoon.

It's really about as easy as painting so pretty much anyone can do this on their own. The only downside is the burnishing step which gets old fast. I tried a few shortcuts around it with an electric buffer that I read about online but none worked out. The ones that did polish out the plaster polished it way too much and it looked too smooth like paint on a car. There really aren't any shortcuts out there so don't bother trying them.

We also figured out the sinks and all other hardware, including a couple of options for the doors throughout the whole house. We're waiting on pricing for one of them before we make up our minds. What I thought was funny over at the showroom is that the same stuff we have on the doors now from 18 years ago is still available. Probably in that polished brass color from the '90s too (eww!) if you ask. We're going with something a bit nicer. All this stuff came from Ferguson's which has an awesome selection and completely destroys Lowes / HD pricing for the things that both places carry.

We also started installing cabinets. There's only one that could be installed so far, but we went ahead and did it anyway just to see how the blue and brown go together. Looks pretty good. It was loads of fun to install because it's almost exactly the width of the room, but we got it done somehow. Still needs hardware, like all the other cabinets will need at some point.


Coming up this week... I need to call the glass place we chose and let them know there will be an order... just as soon as the shower is installed and we have exact dimensions. The tile place came by on Wednesday to estimate what it would run to remove the existing floor and shower. Never heard back from them so I guess tomorrow I break out the air hammer and go at it myself. I'm not exactly enthusiastic about that, but the mortar holding these green tiles in is a lot weaker than the nasty stuff underneath the other tile. Yesterday I tested one and it came out easily so this might not be so bad. They were also going to quote me on granite for both the kitchen and bathroom but no call so far, so I'm going to call a couple of other places. Their numbers weren't that great anyway so maybe I can get better service and a better price. The last thing coming up is to get the stone and tile actually delivered which I'm really not expecting to be a problem.

Between the wait time for the granite and the shower glass it'll probably be another two weeks before the bathroom is fully functional again. In the meantime we'll move on to the kitchen, because in the informal dining room we know we want to do the same plaster as in the bathroom and that will give us something to do. We have a plan at least. Anyway, more to come!

Wednesday, June 16, 2010

Day 10

I know... I missed a day yesterday but every other day is working out pretty well too.

Since the last post I've completed painting the crown molding and moved on to working on the walls. The sheetrock is a little torn up from taking the wallpaper off, but nothing beyond the brown paper layer showing in a few places. To start fixing that little problem I found out that the best way to start is by priming the wall, then using a joint compound to fill in the low spots. When I tried the joint compound first it bubbled the gray paper from the moisture. Primer does that a lot less so now I'll be able to smooth out the two or three low spots.

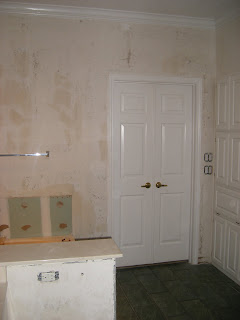
The hole in the picture was covered up underneath the layer of floral wallpaper. I guess the first owners had a hand towel holder there, which really isn't a bad idea. I may go ahead and put one in because the idea is kind of growing on me...


The cabinets came in today too. Of course I can't actually install any of them yet but it's nice to have them around.


I also found out from test fitting the panels below the bathtub that the tub isn't installed level and that will have to be fixed in order for the panel to fit. Joy. That day will come soon enough, but for now plans are to finish up with the walls and do the plaster. I know that the hardware and light decision hasn't been made yet but I have to move on. The locations of existing holes will be marked down in case they're needed, but they will be filled in. I'm hoping the walls will be ready tomorrow and then we can move on to the plaster work on Friday. So far it's turned out to be a good decision because sanding and priming them makes a huge mess and it's nice not to have to keep that stuff from getting the floor dirty since that tile will be gone soon.

One thing I've learned from this project is to try and keep the place clean at the end of each day. With the wood floor work I didn't, kind of because it really took over our ground floor. But with this, it really helps keep all the work contained to one room and keep the dust and everything else from escaping and turning the whole house into what feels like a construction zone.

Monday, June 14, 2010

Day 8

It's been a little too long since the last update. Here's what has been going on since then.

I've kind of gotten to the point where there's nothing that can be done with the shower and floor areas until the old stuff is removed. Same for the countertops and cabinets. So I've been working in other areas. Mostly up high.

This weekend I painted the ceiling which is a surprisingly hard thing to do well. Along with that, I had to touch up a few details. What you can see of the light fixtures in the ceiling along with the heater weren't looking too well. A couple of fresh coats of paint took care of that and now they look as good as new. Right now I'm halfway through the second coat of paint on the crown molding.

Then I was able to move on to the doors, door frames and casing. I'd like to say that the power sprayer helped speed things up but it doesn't spit out paint in a smooth enough pattern for the doors and I had to go over it all with a brush. The only real tip here is that latex paint and a sprayer don't really mix that well but at least it will throw a lot of paint on the door quickly.

We also got the mirror off the wall. It was attached with a black adhesive that was a bit of trouble to get off. Once upon a time it was attached in five places, but today I think only one of them was holding on anymore. The mirror is 6 1/2 feet x 4 feet so it was HEAVY!

Anyway here's the latest. Our plans for tomorrow are to finish the second coat of paint on the molding, then start to work on the walls to get them primed and smooth because the next big task is to apply the plaster finish.


Thursday, June 10, 2010

Day 4

Yes I know there was no day 3 post... I wrapped up a little late for that.

The wallpaper is taken care of now. The water closet had two layers, but the lower layer was SOLID. I had no idea it was there, except for the little bit peaking out from behind the cabinet. So I decided to leave it there. I could tell that the loose spots were removed and smoothed out with drywall compound and I'm going to leave it alone. It just damaged the drywall too much trying to remove it where I did. Since it's stable I'll leave it alone.

The cultured marble is off the bathtub backsplash for the most part. There's no real trick to removing it in one piece. Just cut the silicone around the edges and carefully pry it off. Everything attached to the ceiling has been removed to prepare it for paint, the medicine cabinet is down, and the crown molding has been sanded. At this point about the only things remaining are the shower itself, the countertop cabinets, and tile. I'm going to try and schedule a crew to remove all tile (shower and floor) and another to take care of the shower glass and take down the giant mirror sometime early next week.

But this weekend I have some work of my own to do. I plan on painting the ceiling and baseboards, and work on preparing the walls by repairing drywall and priming. We also need to figure out the hardware we would like to use because that makes a difference whether I will need to move the towel rack or not. We also need to figure out whether we would like to install a hand towel holder near the sink and another towel holder by the shower. I'm also ordering a new vent fan for the water closet because the one in there is loud and damaged from someone putting in a light bulb that was too bright for the fixture.

Anyway here are the pictures of what everything looks like today. It doesn't look like a lot but it took a lot of work to get here.


So far no real surprises. Nothing interesting hidden in the walls. Nothing written on the back of anything, except for the name of the builder and the order number for the cultured marble. No bad surprises either. You can see under the countertop in the next picture that there's a hole in the sheetrock. There's a good reason for that and I'll post more about it later.

Tuesday, June 8, 2010

Day 2

Today I just worked on removing wallpaper in the bathroom. The main part of the bathroom is nearly done - the floral stuff has been coming off pretty easily. The water closet however... that has been trouble. It has 2 layers of wallpaper and the older, ivy layer is very hard to remove without damaging the wall. It doesn't peel into two layers like the newer layer does. Tomorrow I will go get one of those wallpaper removal tools (I really don't know what they are called). Then hopefully I'll be able to finish up the water closet and be more or less done removing wallpaper!

Monday, June 7, 2010

The Bathroom - Day 1

Today we started the bathroom remodel. First there are a few before pictures to show off how scary it looks. Yes, that's Danielle celebrating something with the dog in the second picture.


The first thing to come off was all the baseboards. I was going to remove the door casings too but it really wouldn't do a whole lot. Only one came off, and that's the one that wasn't cut quite right by one of the closets. Next we took off the small cabinet in the water closet, and that gave us a great view of what the wallpaper looked like when the place was new. I think the older ivy pattern is better, but Danielle thinks the flowers are less scary. In the main part of the bathroom the layer with the ivy is already gone, so for the most part we only have one layer to remove.


After that we still had a little time left so I decided to have a go at the wallpaper. The wallpaper we have is the type that has a vinyl coating on the surface, so it's coming off in two parts. The good news is that it's been coming off MUCH easier than I've described. If you've ever considered removing wallpaper you've probably been told countless stories about how horrible it is, but it's really not that bad. The outer layer peels off, then a spray bottle with some Dawn dish soap mixed with water will loosen the paper layer below. It carefully peels off leaving the sheetrock below unharmed.

There will be plenty of pictures of that tomorrow - we made great progress today and Danielle is amazing at this part of the project so we're ahead of schedule. We will probably be busy removing wallpaper for at least another day or two before moving on to something else. My goal was to keep the bathroom useable for as long as possible, but that won't be the case for very much longer.
 
Locations of visitors to this page